Intro
This discussion follows on from the Coal Power 101 guide, the focus here is about expanding coal power, in particular using overclocking and underclocking. You will need to have unlocked Overclock Production in the MAM under the Power Slugs branch to be able to achieve what is set out in this guide.
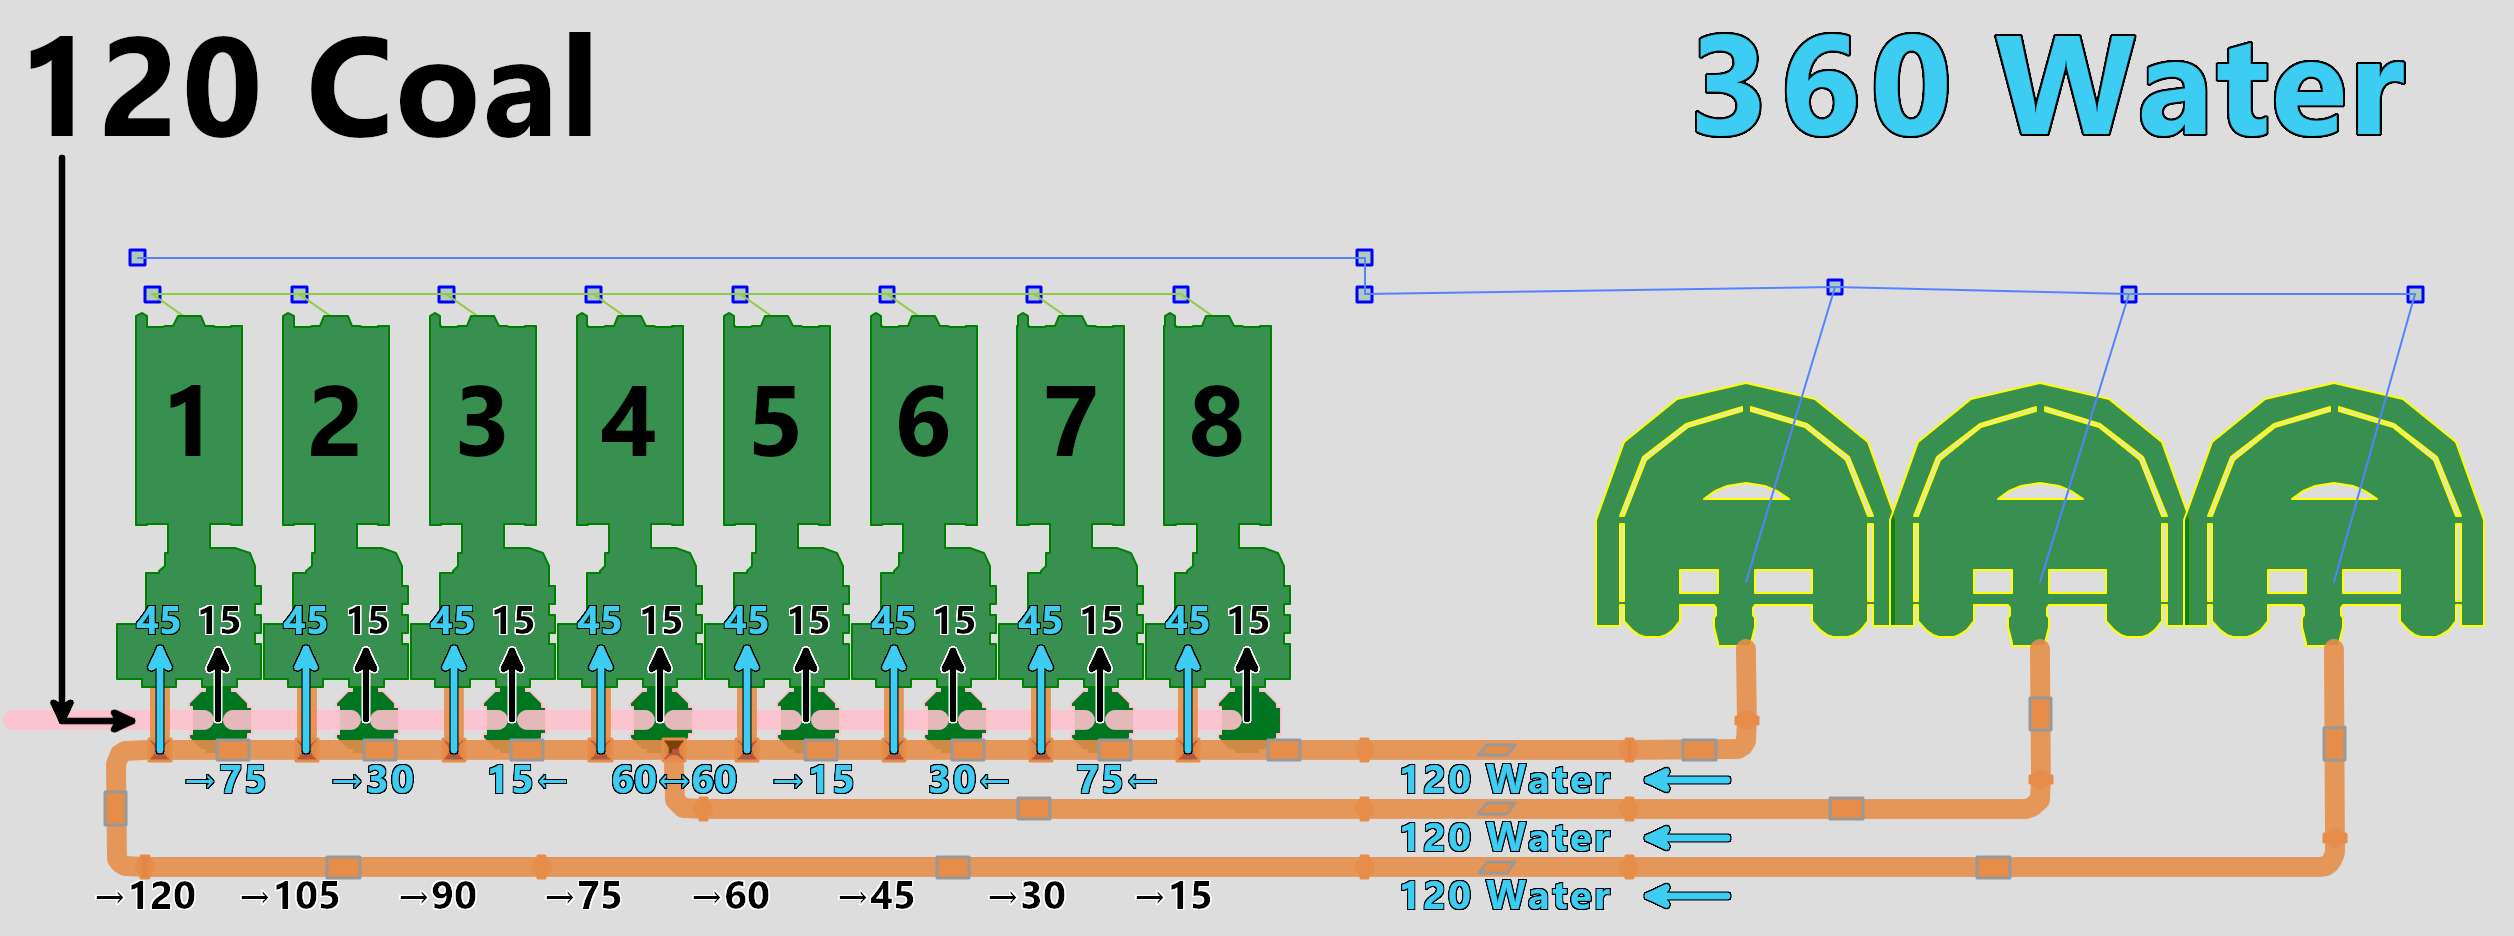
When you were first introduced to coal power you had the Mk.1 Miner and Mk.2 belts, with the belt limitation of 120 coal pm. This limitation restricted us to running 8 coal generators off one Mk.2 belt.
Mk.3 Conveyor Belt
In Tier 4 of the hub there are two milestones to unlock that will help expand your coal power setups. First up is Logistics Mk.3 which unlocks the Conveyor Belt Mk.3. This provides a throughput of 270 pm on the belt.

Miner Mk.2
Unlocking Advanced Steel Production provides the Miner Mk.2 which will allow you to double what can be extracted from the coal nodes.

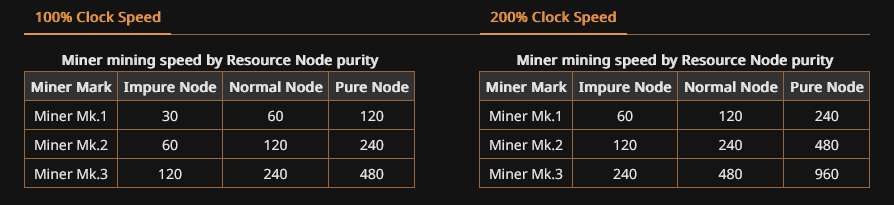
Now right off the bat, you can upgrade the existing Mk.1 miner on the coal node to a Mk.2 and you will now be able to extract 240 coal pm from the node. A pure node provides 240 coal at a clock rate of 100%, a normal node will require you to overclock the miner to 200% to get 240pm. Any future reference to miner clock rate will be in relation to using a normal node.
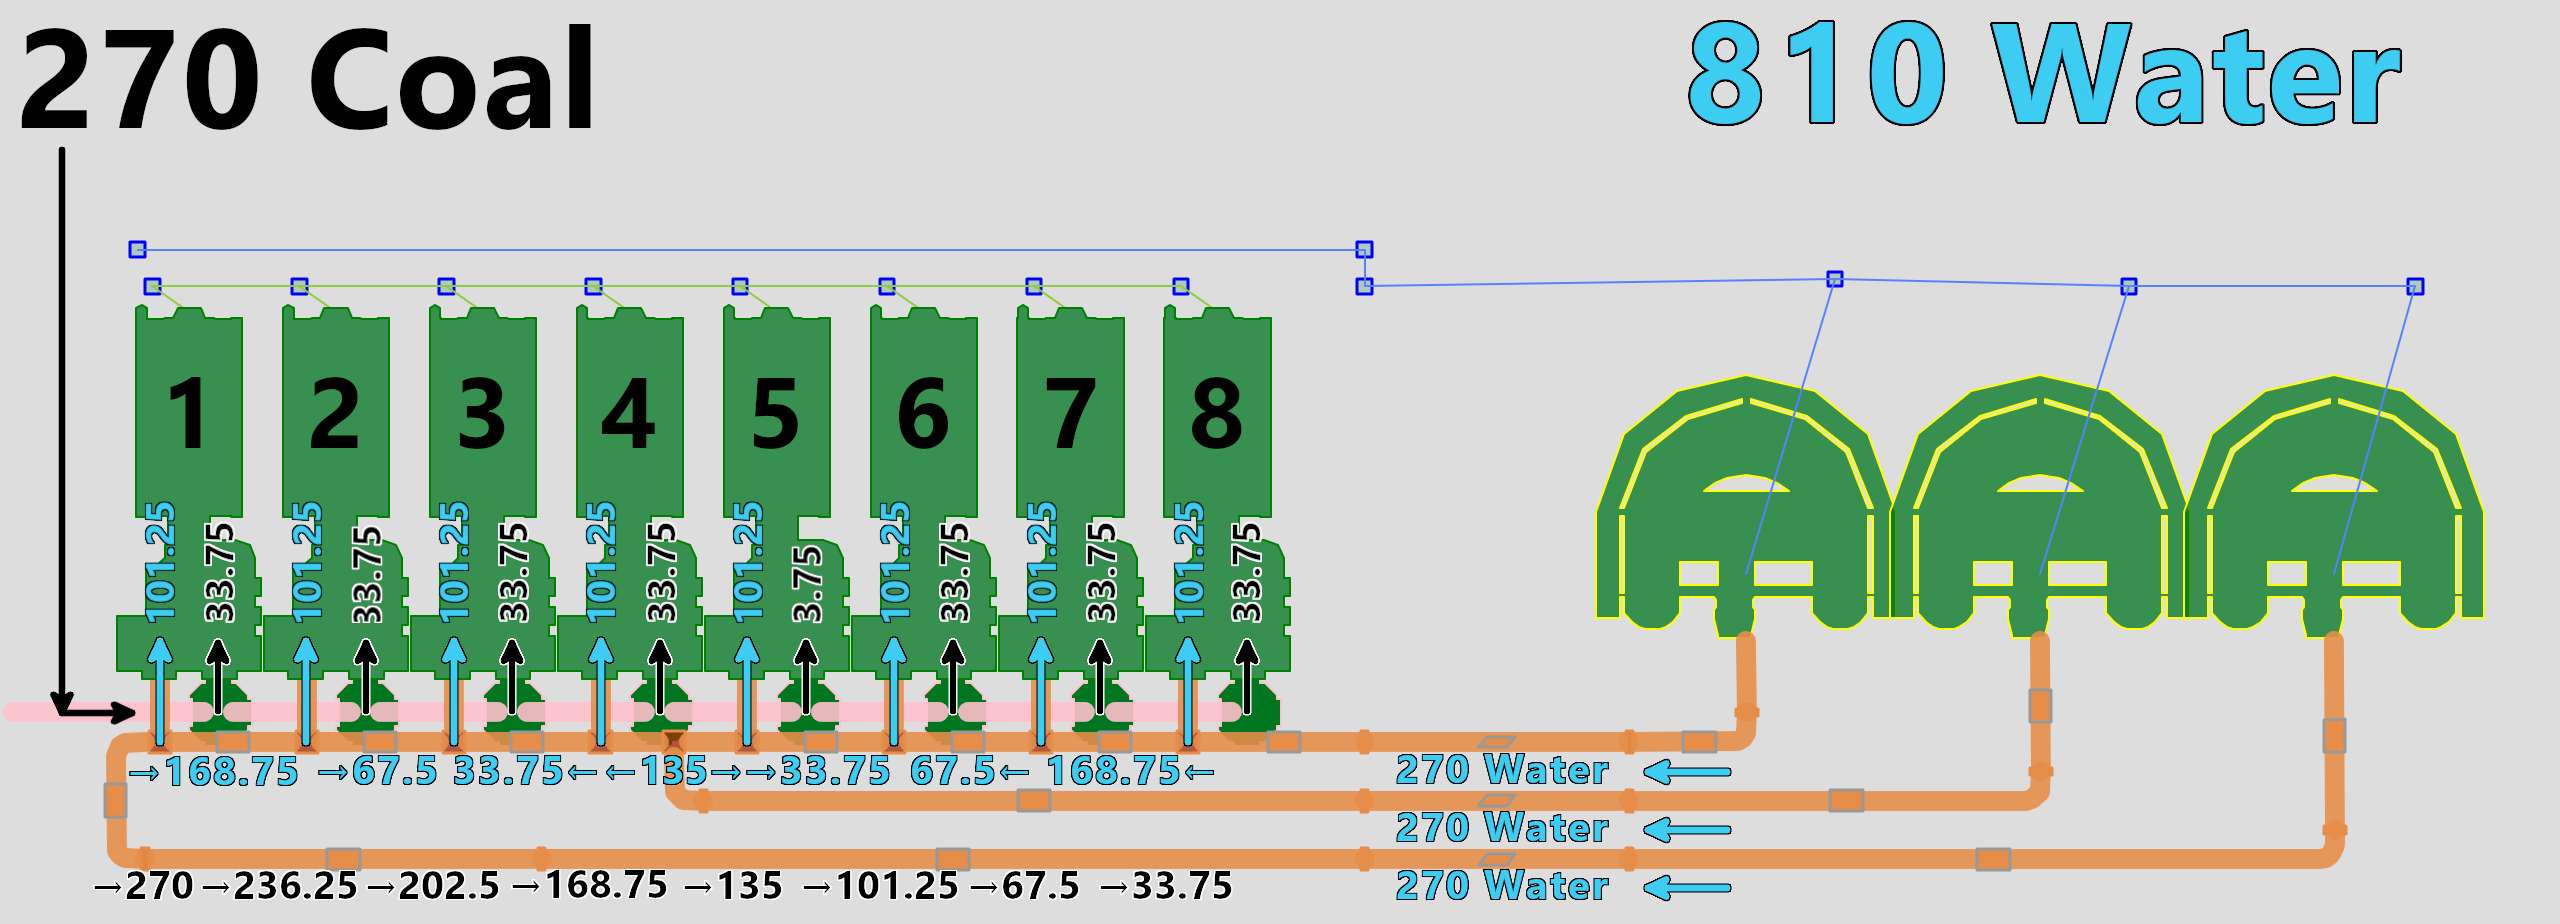
Remembering that each coal generator requires 15 coal, 240 divided by 15 is 16, we now have the ability to fuel 16 coal generators off the one belt. Technically we can max out the belt to 270 and get 18 coal generators but I'll come back to this later, I have a reason why I'm sticking to 240 coal.
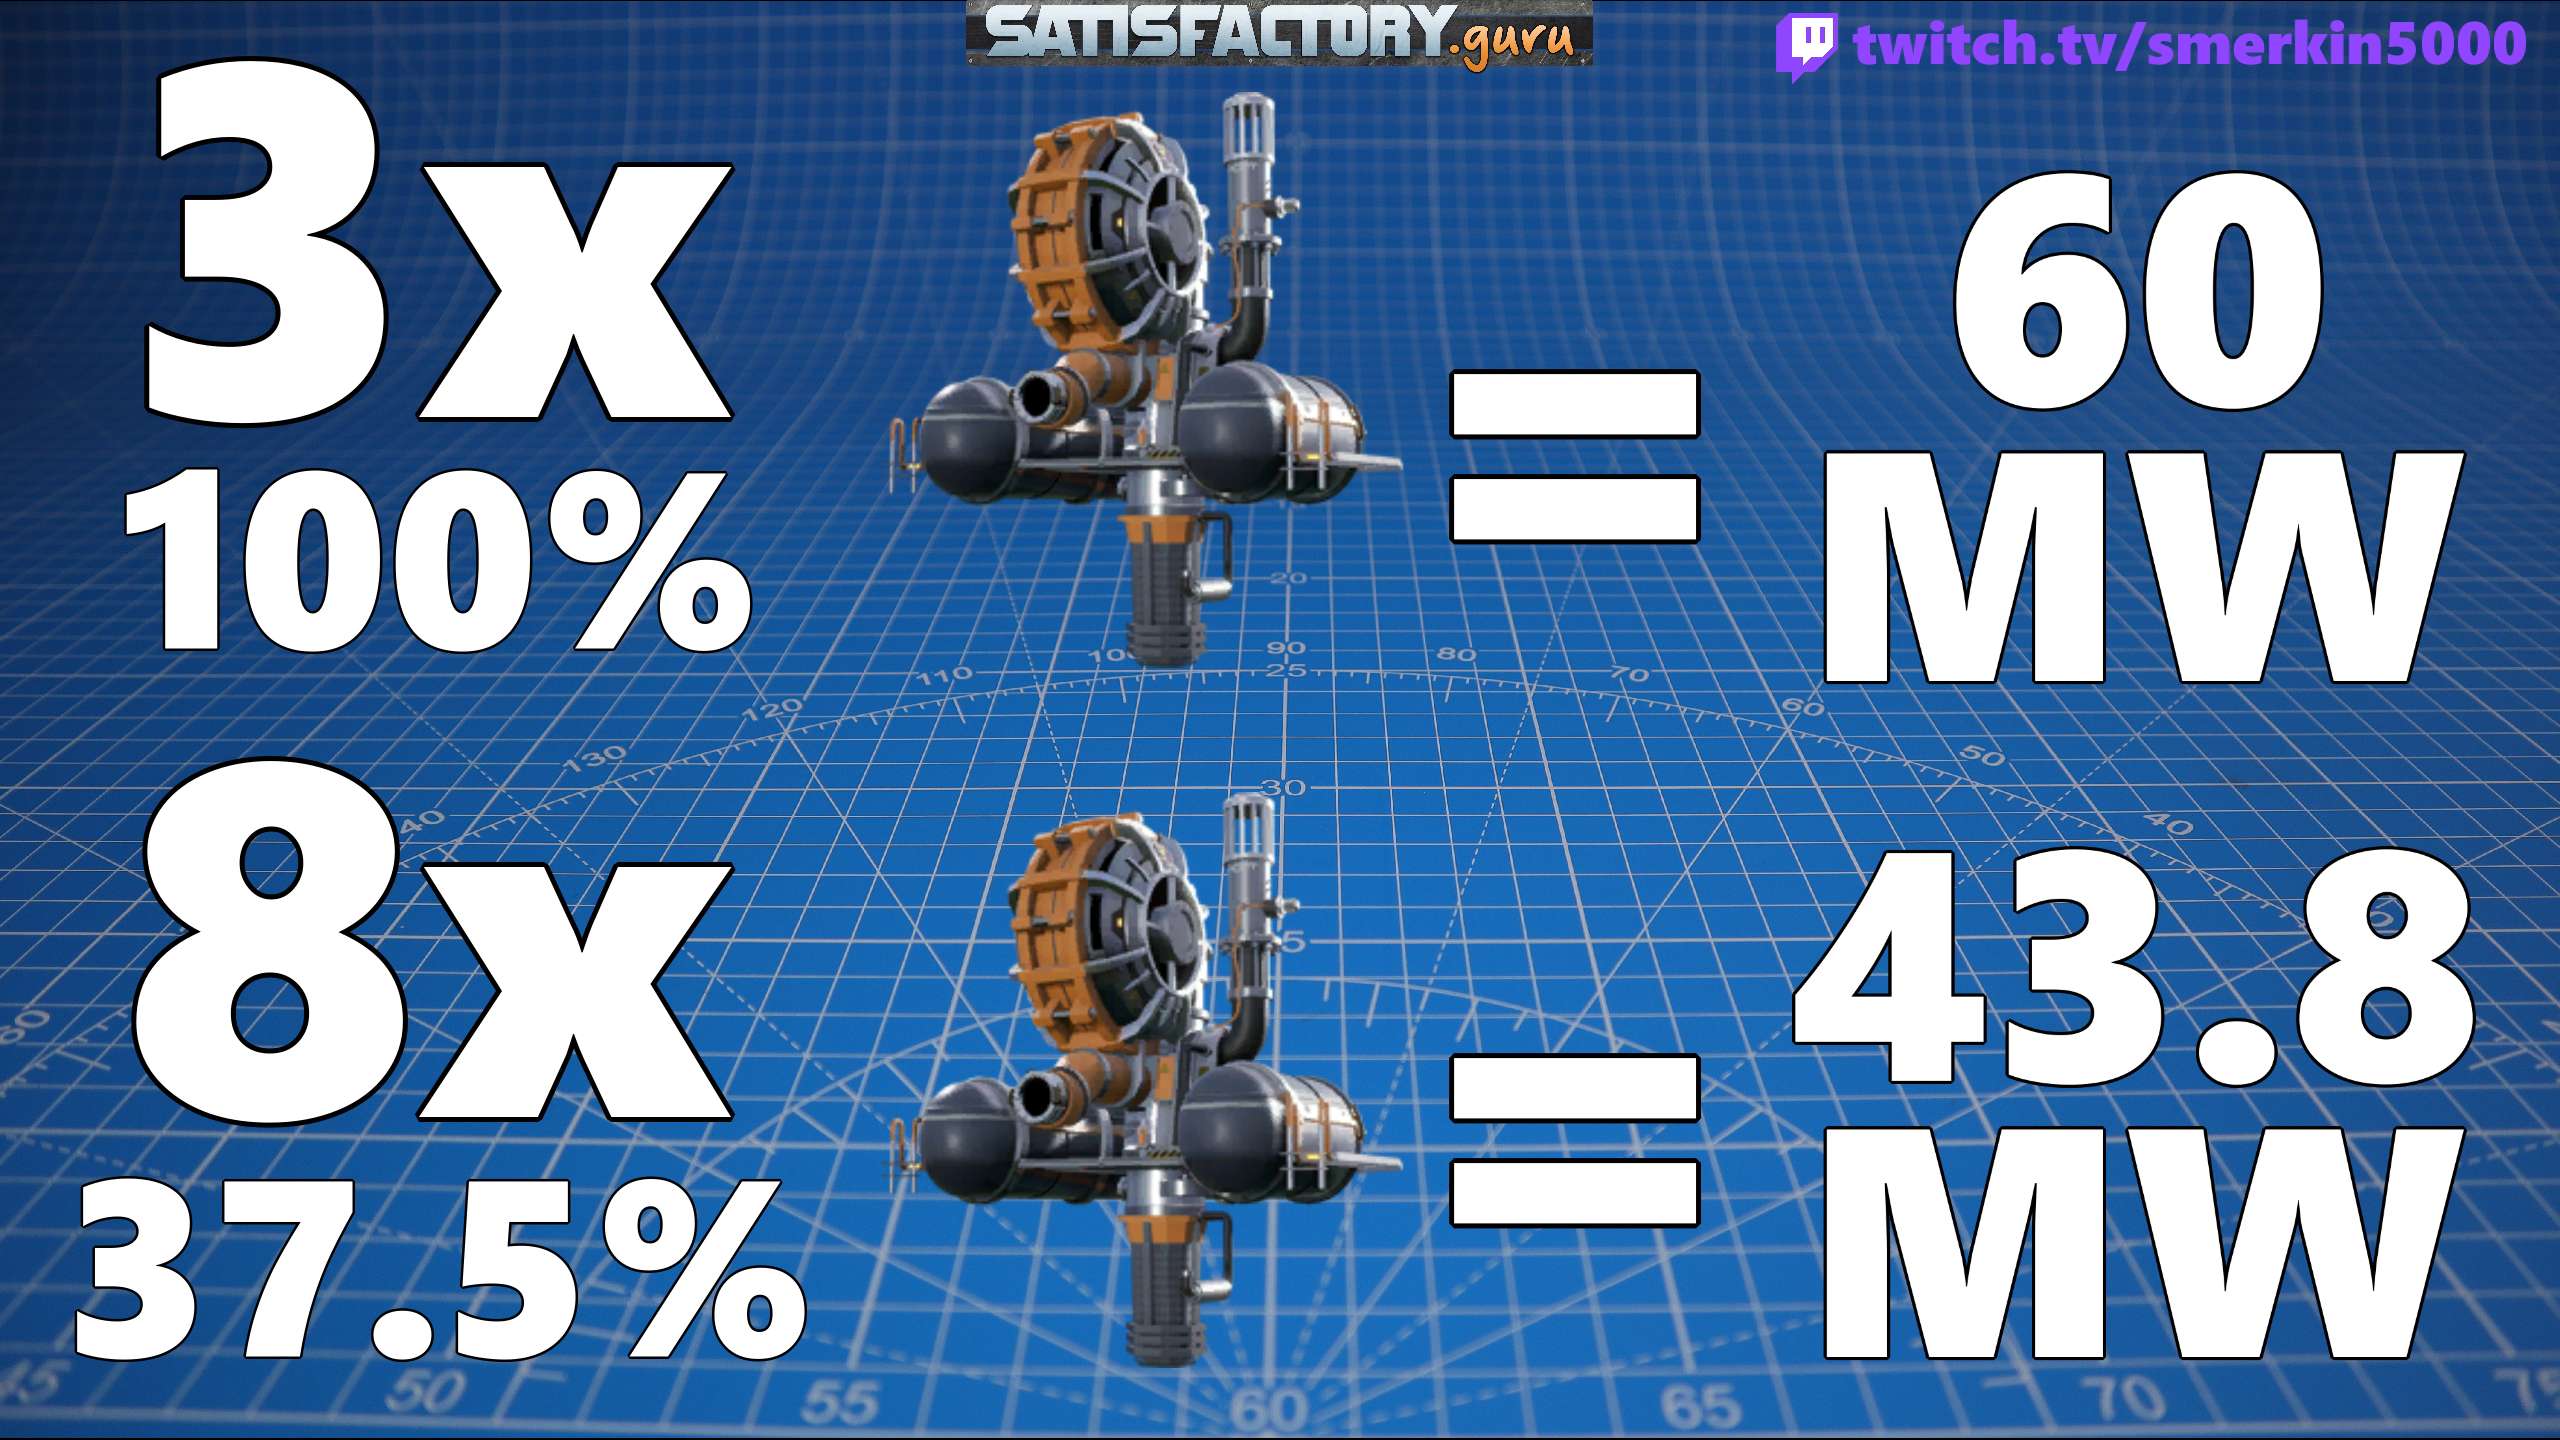
So you could immediately build another 8 coal generators and three water extractors and double the coal power produced from that miner using a Mk.3 belt. However what if I said you could double the power produced from your existing coal setup WITHOUT needing to build any more coal generators or extractors, you'd say shutup and take my money.

Double Power Without Building
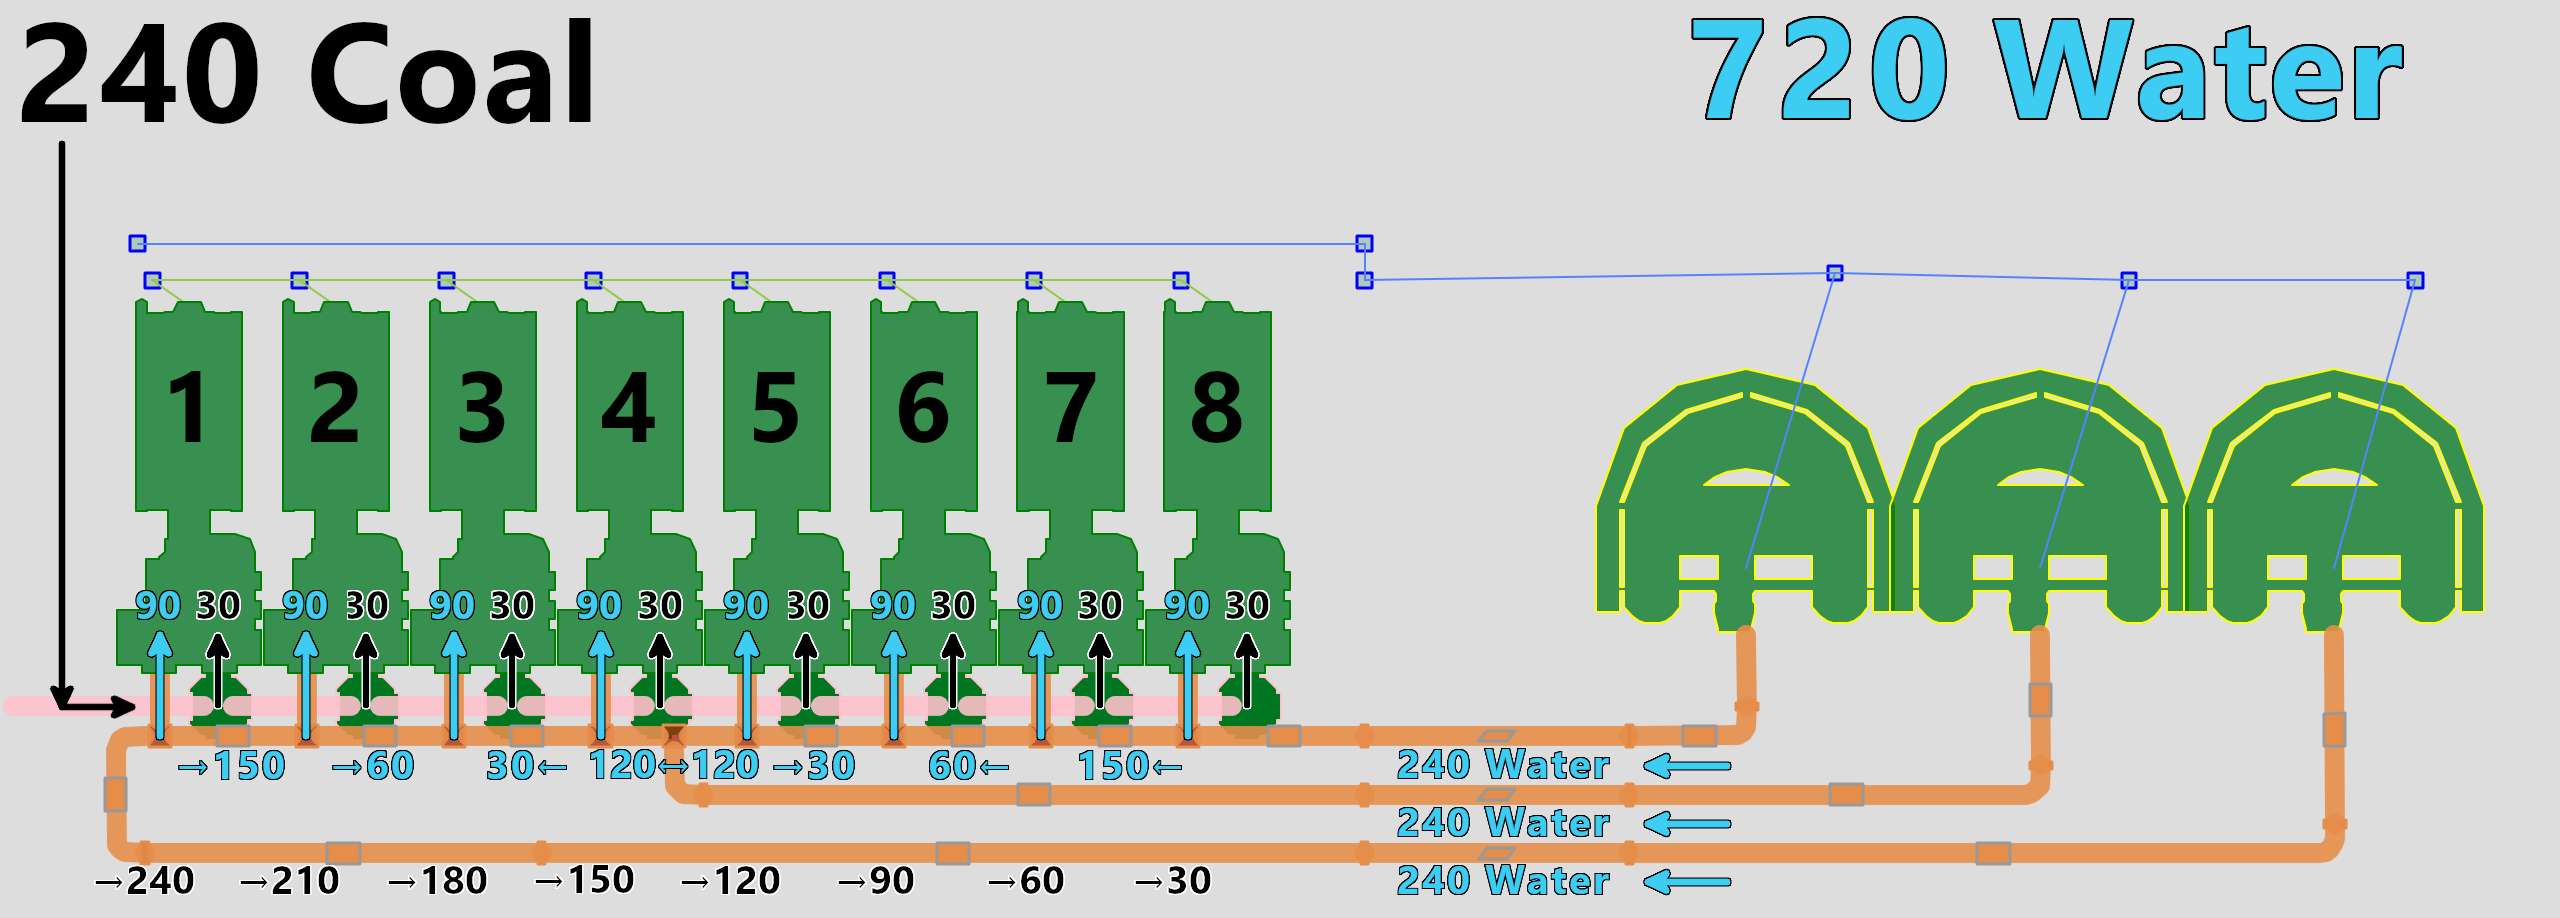
Overclocking is how this is achievable. By overclocking the coal generator to 200% using two power shards you double how much power it produces to 150MW, but also double the amount of required resources. This means that the coal generator now requires 30 coal pm and 90 water pm. So 30 coal multiplied by 8 coal generators is 240, hence why I was focusing on only putting 240 coal on the belt. This means that you will need to UPGRADE the conveyor belt from the coal miner to the coal generators from Mk.2 to Mk.3 including each segment between each splitter along the manifold.
Additionally you will need to overclock the water extractors by 200% each, they will now produce 240 water per extractor. 90 water multiplied by 8 coal generators is 720, and 720 divided by 3 is 240, the amount of water we are getting from each overclocked extractor. The existing pipe manifold will support this so there are no other changes required.
Collect Power Slugs
So whats the downside to overclocking? Physically having to go and collect the Power Slugs to turn into power shards. The 8 coal generators require 2 power shards each and the three water extractors require 2 power shards each, that's a total of 22 power shards required to overclock one of these setups. Honestly it doesn't take that long to collect the Power Slugs and if you've been out hunting the crash sites for HDD's then you'll easily find enough Power Slugs.
Power Consumption
The other downside is power consumption due to overclocking, specifically of the water extractors. Overclocking a generator has no additional cost, it just requires twice the amount of input resources. Overclocking a machine requires more power than the equivalent two of the same machine. For example a water extractor at 100% consumes 20MW whereas when it is overclocked to 200% it requires 50MW. So you could build another three water extractors and connect them to the existing pipes and save a total of 30MW overall, you just need enough available water to do this. If you're on the ocean than this isn't an issue but inland water resources are limited on space.
The Mk.2 miner is also going to require an additional 25MW of power, however this is a mute point because you cannot double the output from the node without the upgraded miner.
Keep in mind, if you had setup a separate infrastructure power grid as shown in the Coal Power 101 guide, then you'll need to make sure that grid can supply the extra power the water extractors and miner will need. Specifically you'll need to allow for another 115MW, so two more generators clocked at 100%.
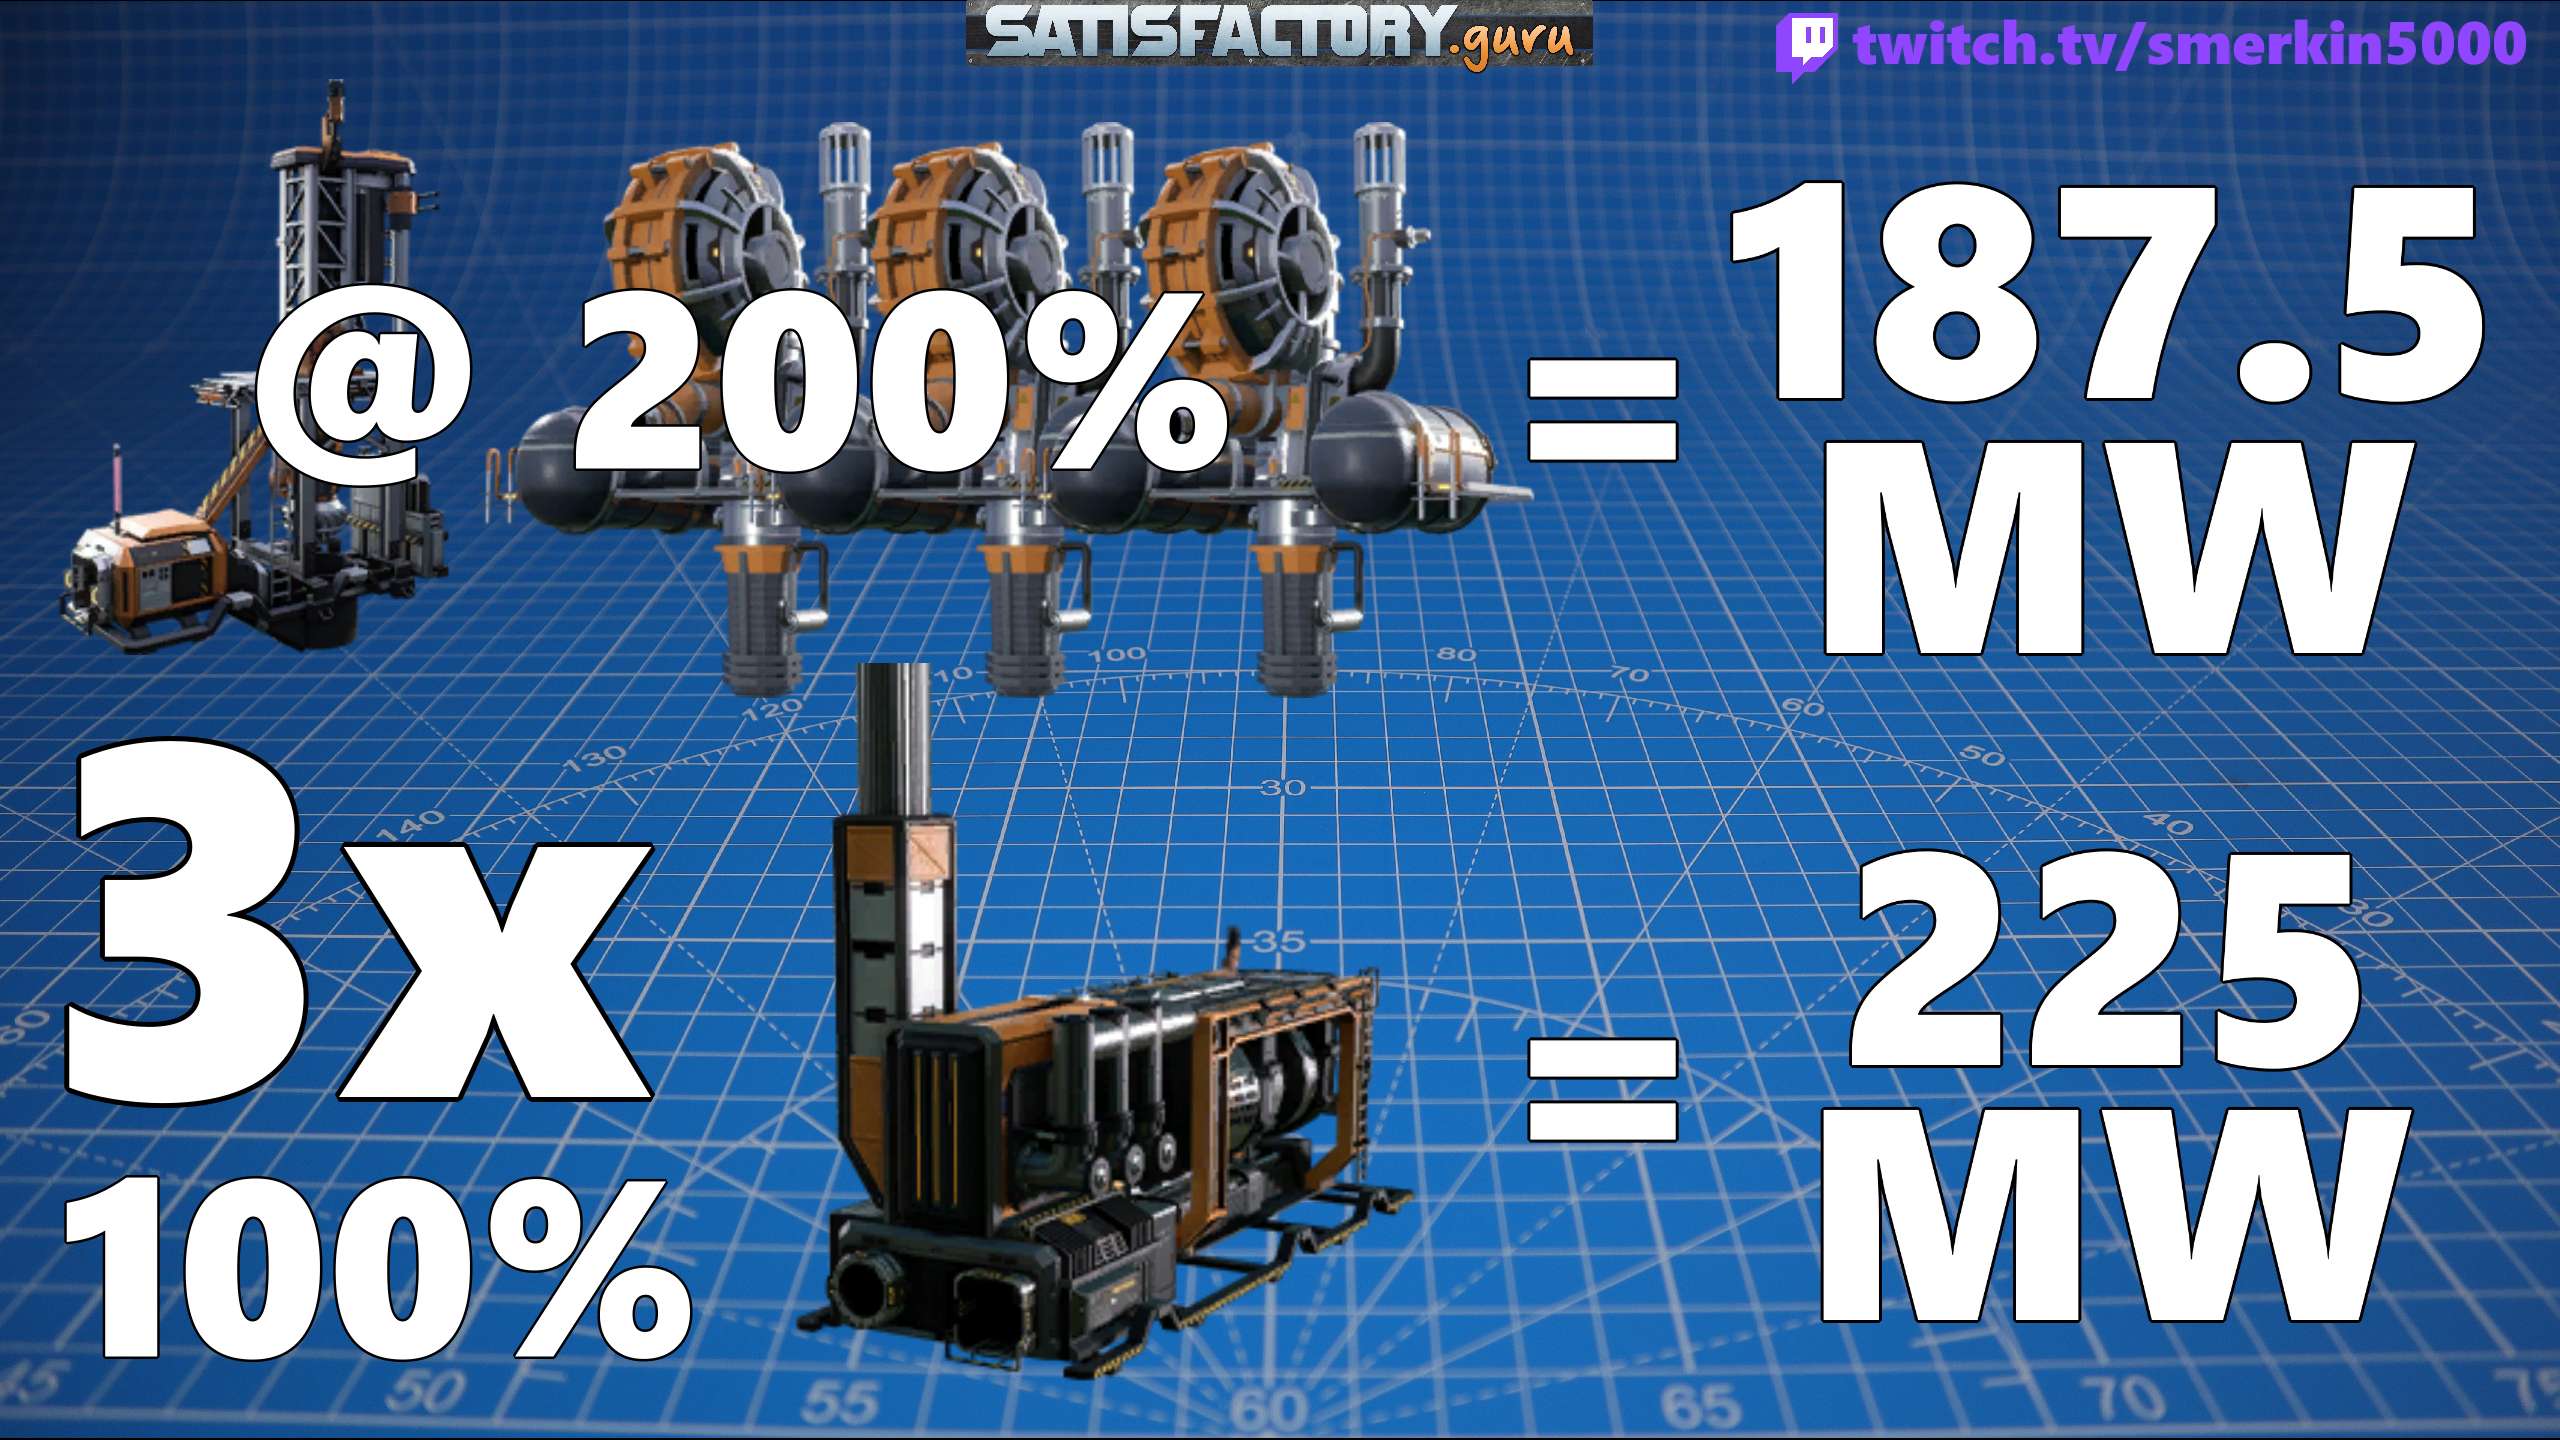
Once you've upgraded everything by overclocking, each generator will now be making 150MW of power. The miner and water extractors now need a total of 187.5MW, so now you'll only need two generators allocated to the separate infrastructure power grid, meaning you can now reconnect the third one back to the main power grid.
Maximize Mk.3 Belt
Returning to a statement I made earlier
Technically we can max out the Mk.3 belt to 270 and get 18 coal generators off that one belt but I'll come back to this later, I have a reason why I'm sticking to 240 coal.
The reason why I stuck with the 240 coal is I wanted to demonstrate how you could double your power output without building any extra machines by overclocking the 8 existing generators.
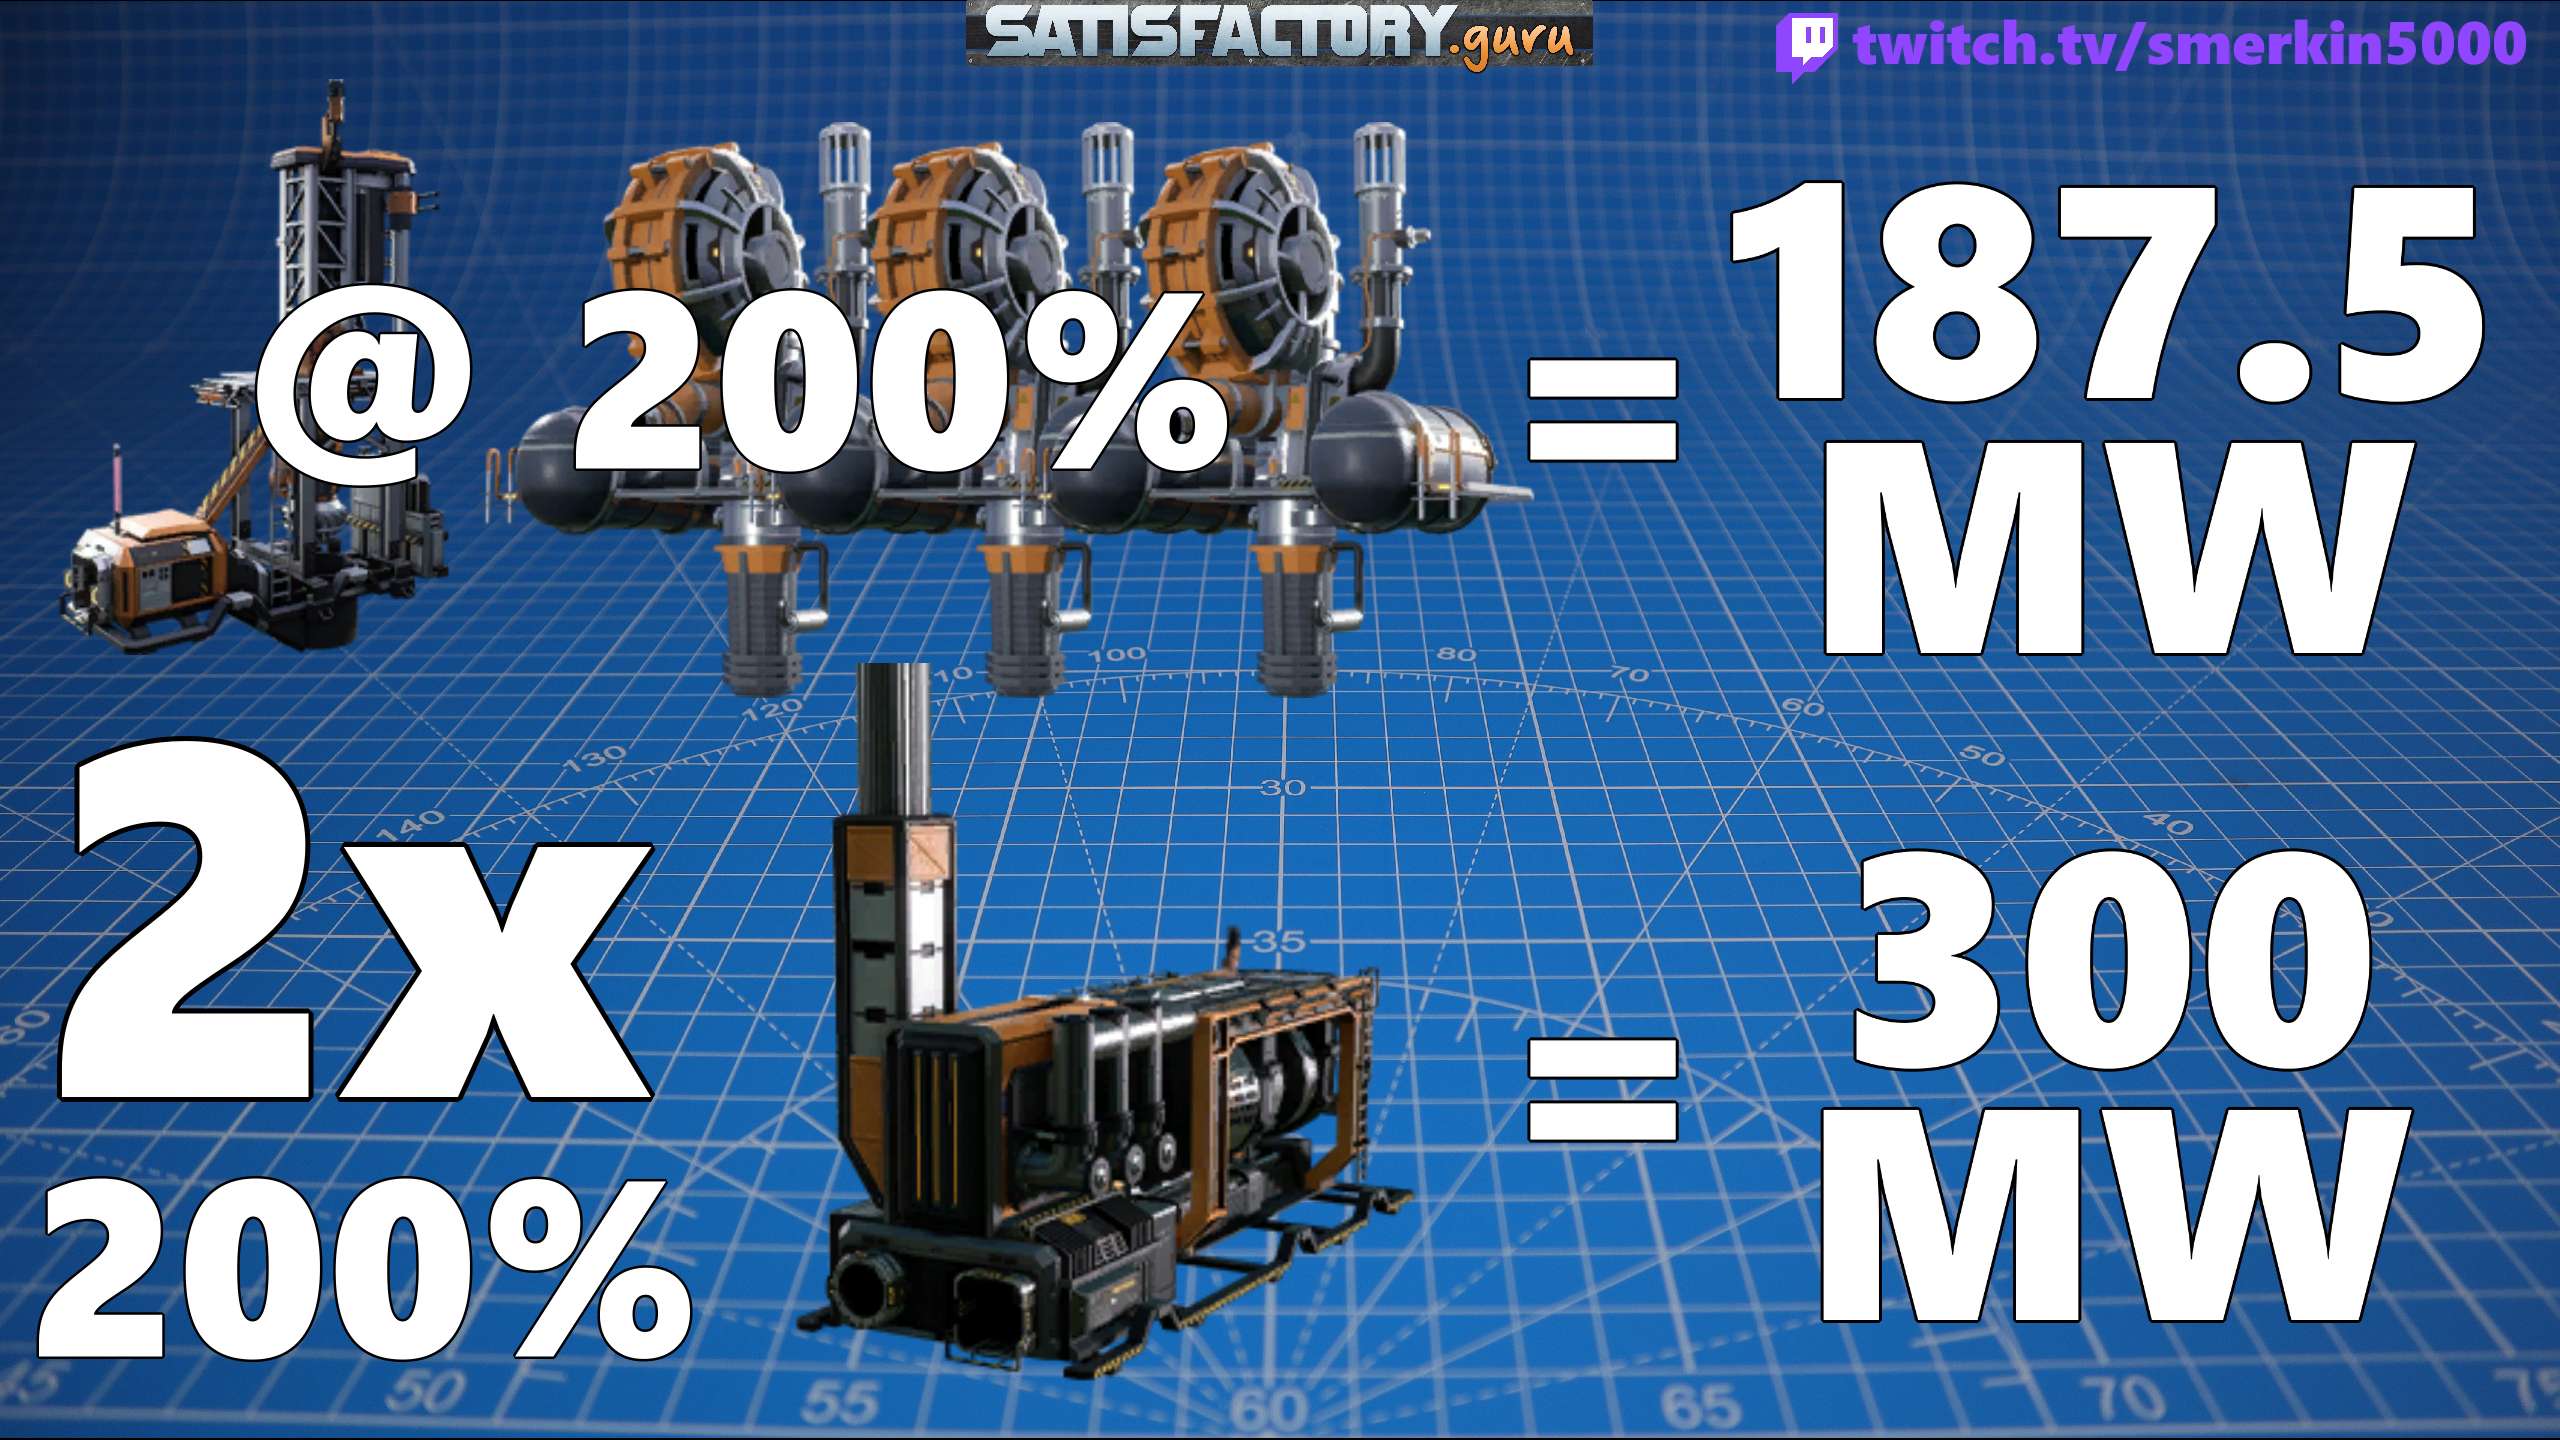
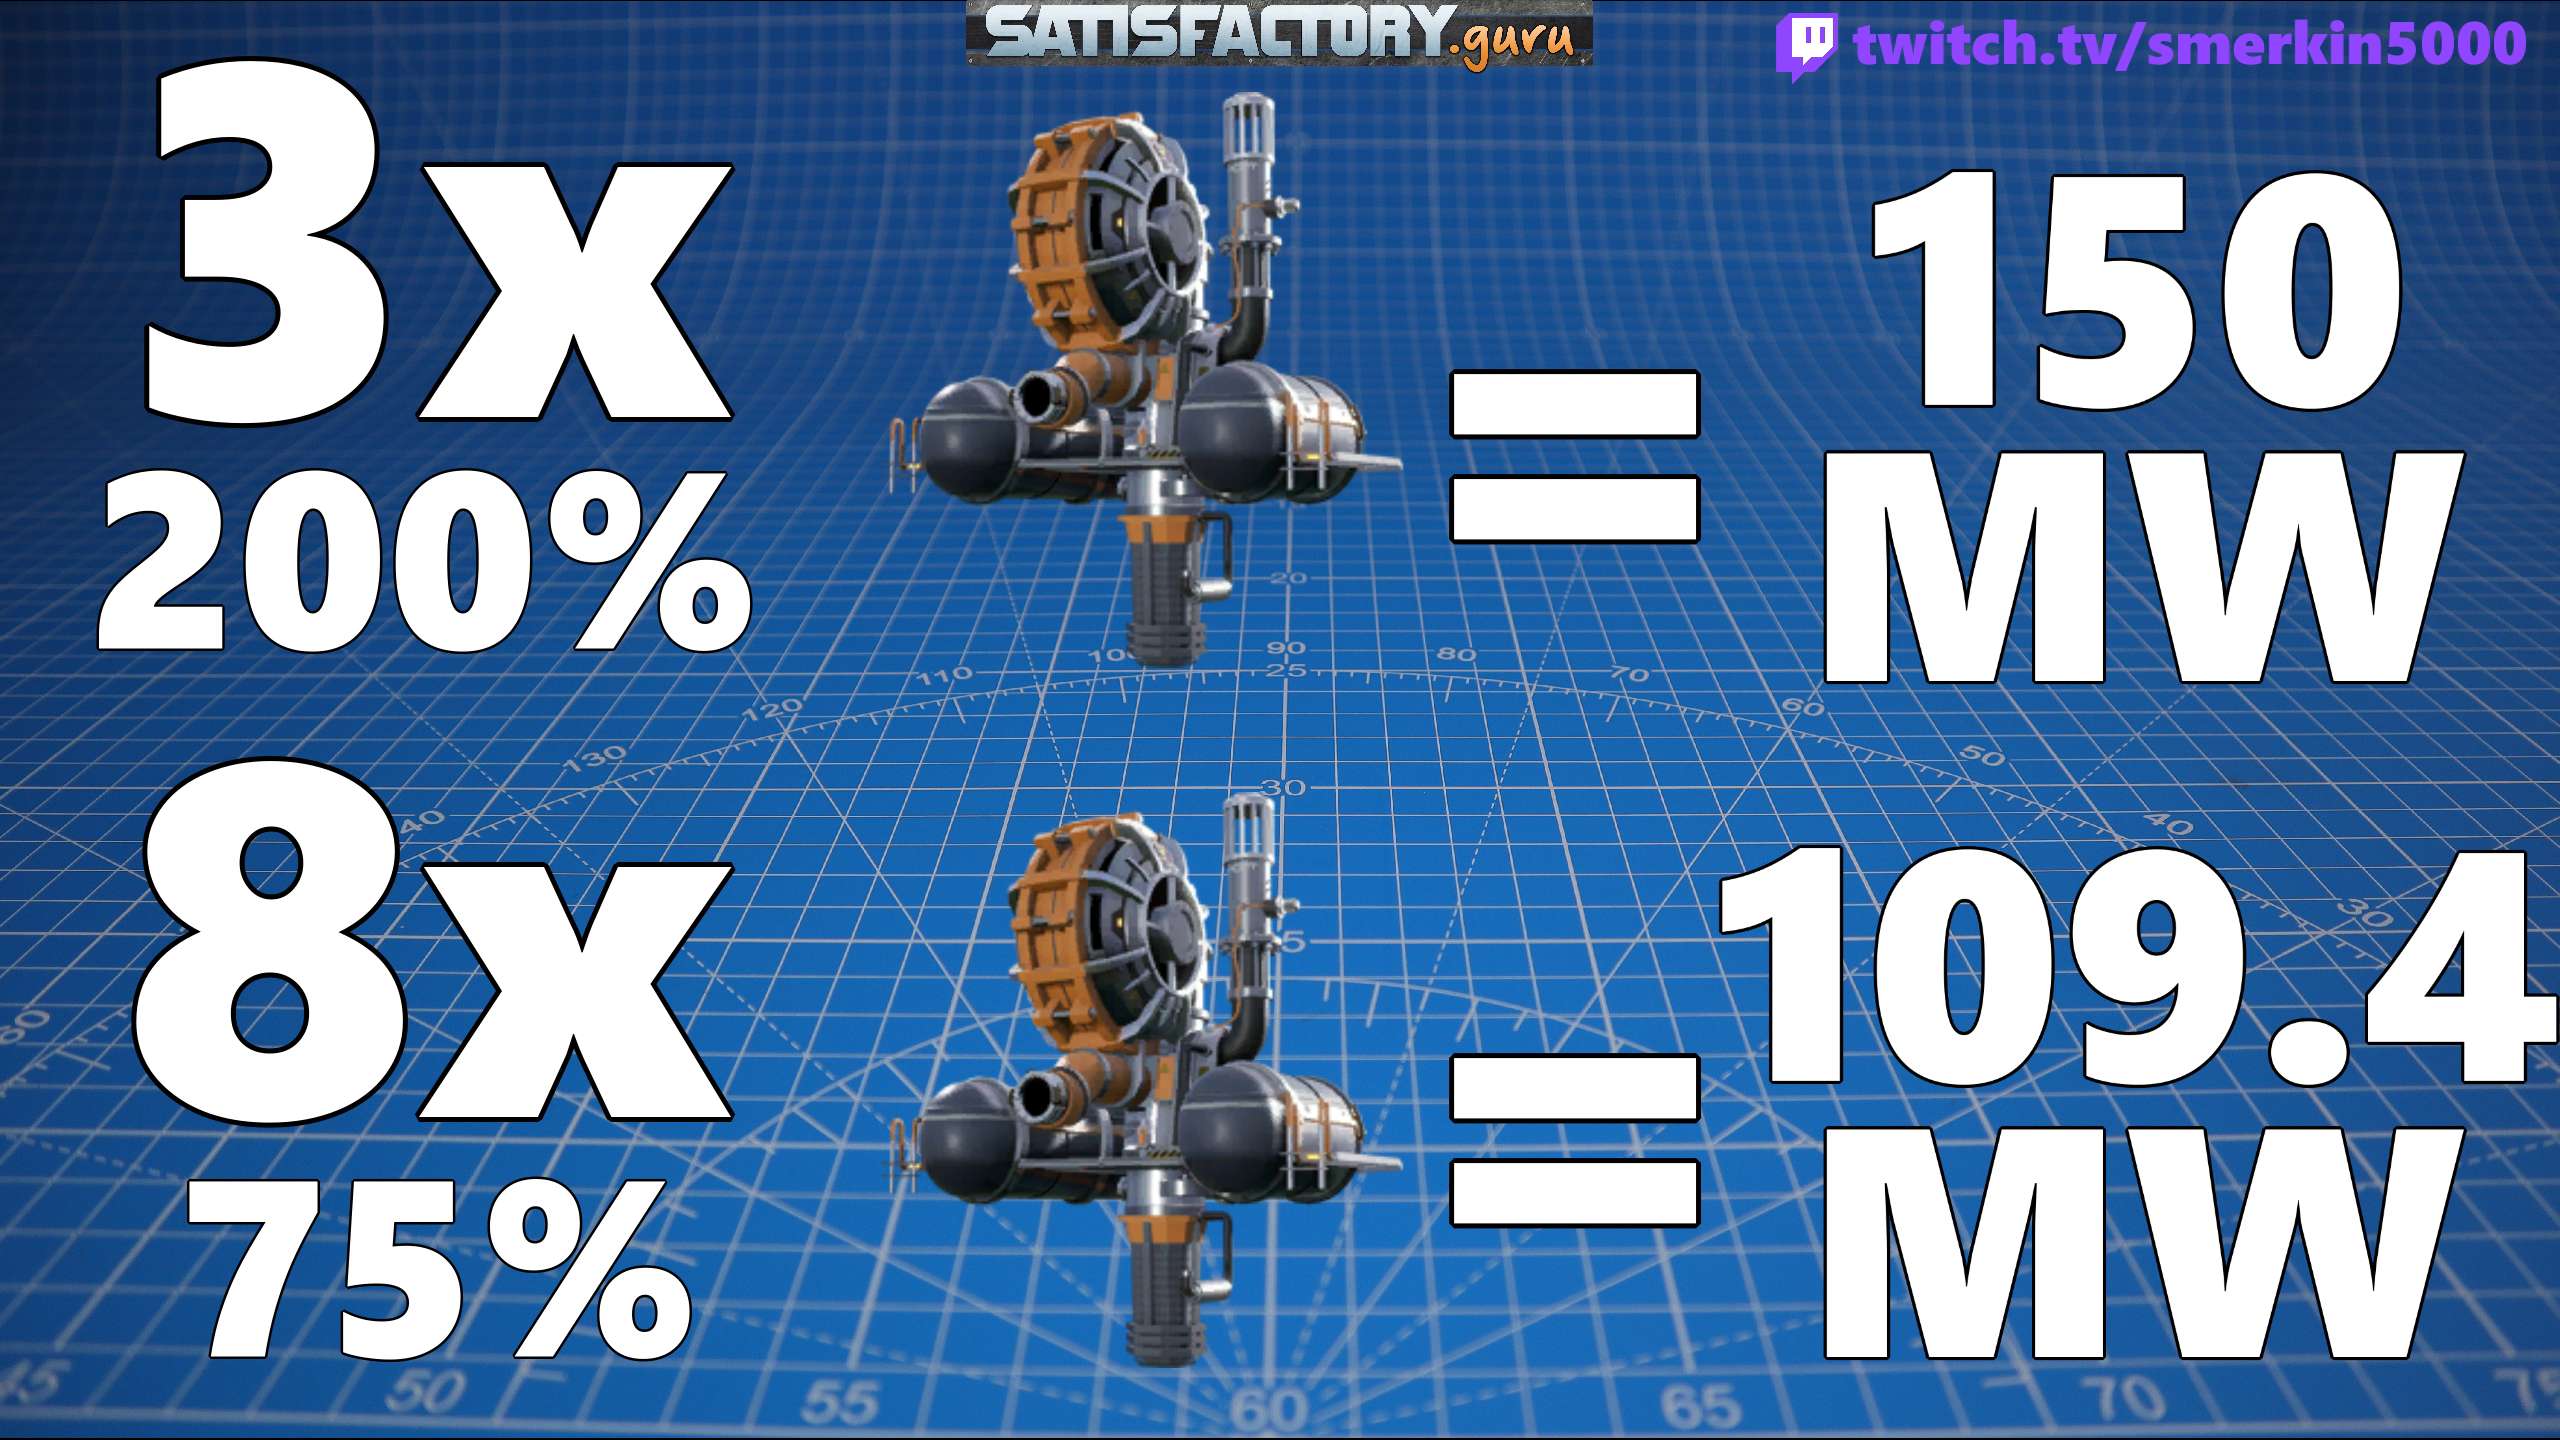
You most certainly can utilise a full 270 belt of coal, this will require you to:
- Overclock the miner to 225%, requiring three power shards instead of two
- Overclock the coal generators to 225%, requiring three power shards instead of two
- Overclock the water extractors to 225%, requiring three power shards instead of two
In total you are going to require 34 power shards, an additional 12 when compared to overclocking @ 200%.
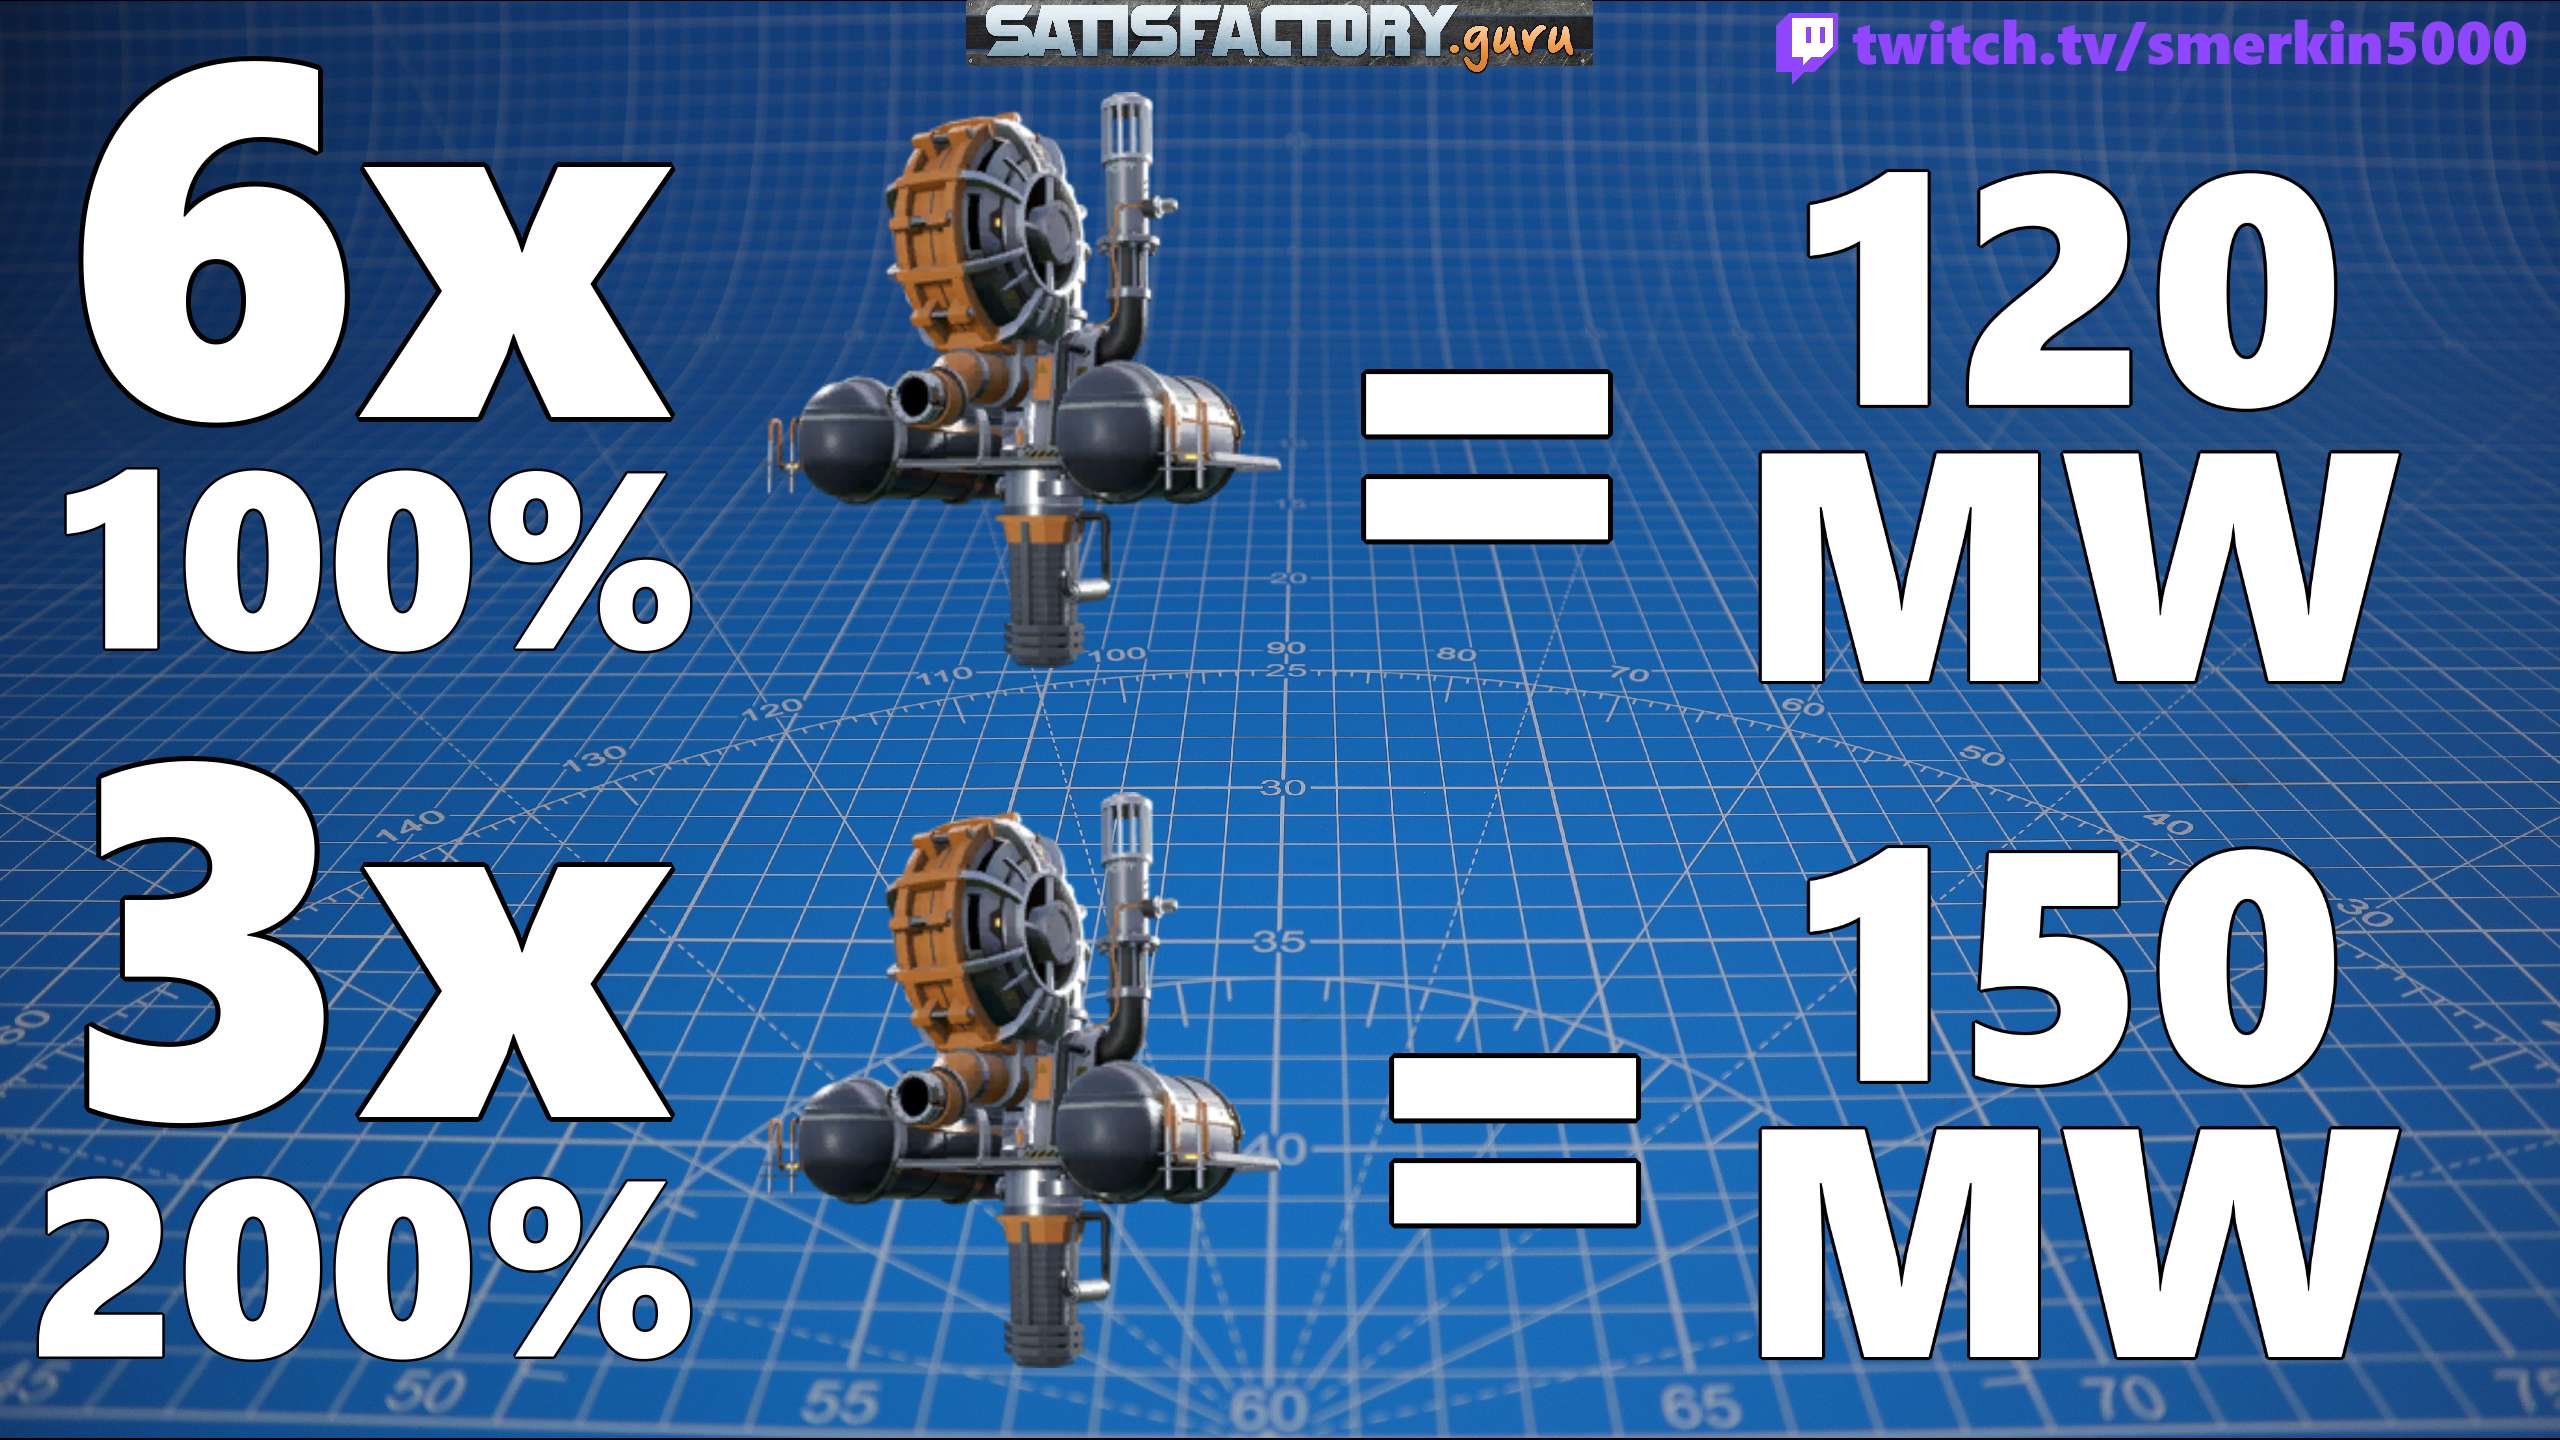
When crunching the numbers, overclocking to 200% using 240 coal will provide 4.22 MW power per 1 unit of coal, compared to overclocking to 225% using 270 coal will provide 4.19 MW power per 1 unit of coal. It's neither here nor there when it comes down to it, but sometimes having an apples to apples comparison can be easier to digest.

But Wait There's More
Now there's nothing really more to talk about with the 8:3 ratio coal generator setup however I did want to demonstrate some alternative builds and why you would choose them over this one.
Impure Coal Node
My first example has to do with node purity, the Coal Power 101 guide started off by maximising a Mk.2 belt to 120 however to do this you do need at least a normal coal node. If you have access to an impure coal node then the most you are going to get out of it is 75 pm when overclocked to 250%.

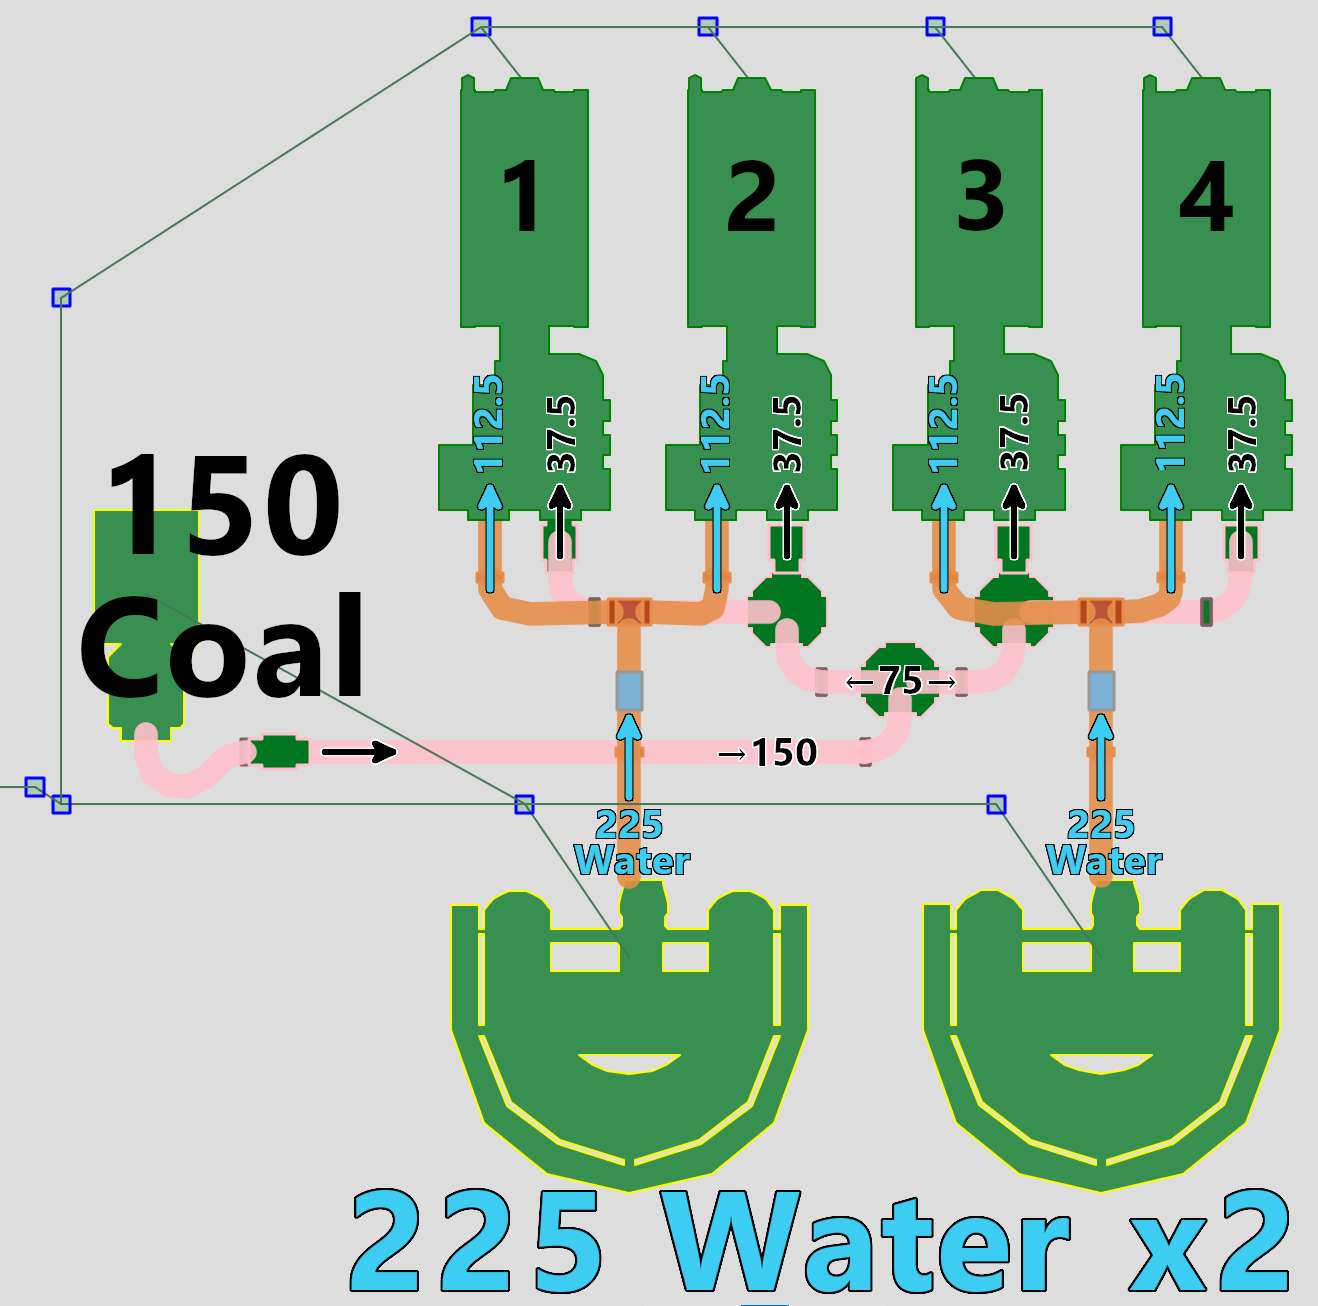
That allows you to power 5 coal generators @ 100% but when I build I avoid using manifold and build using load balancing. So having to spread the coal across 5 machines doesn't balance logically in my brain however across 4 machines is easy. 4 coal generators overclocked to 125% will consume that 75 coal evenly.
At that clock rate each generator requires 56.25 water pm, so I can fuel two of these generators from one water extractor underclocked to 93.75%. I like this setup as I am also NOT using a pipe manifold to connect the water extractors to the coal generators, it's a simple 2:1 coal generator to water extractor relationship.
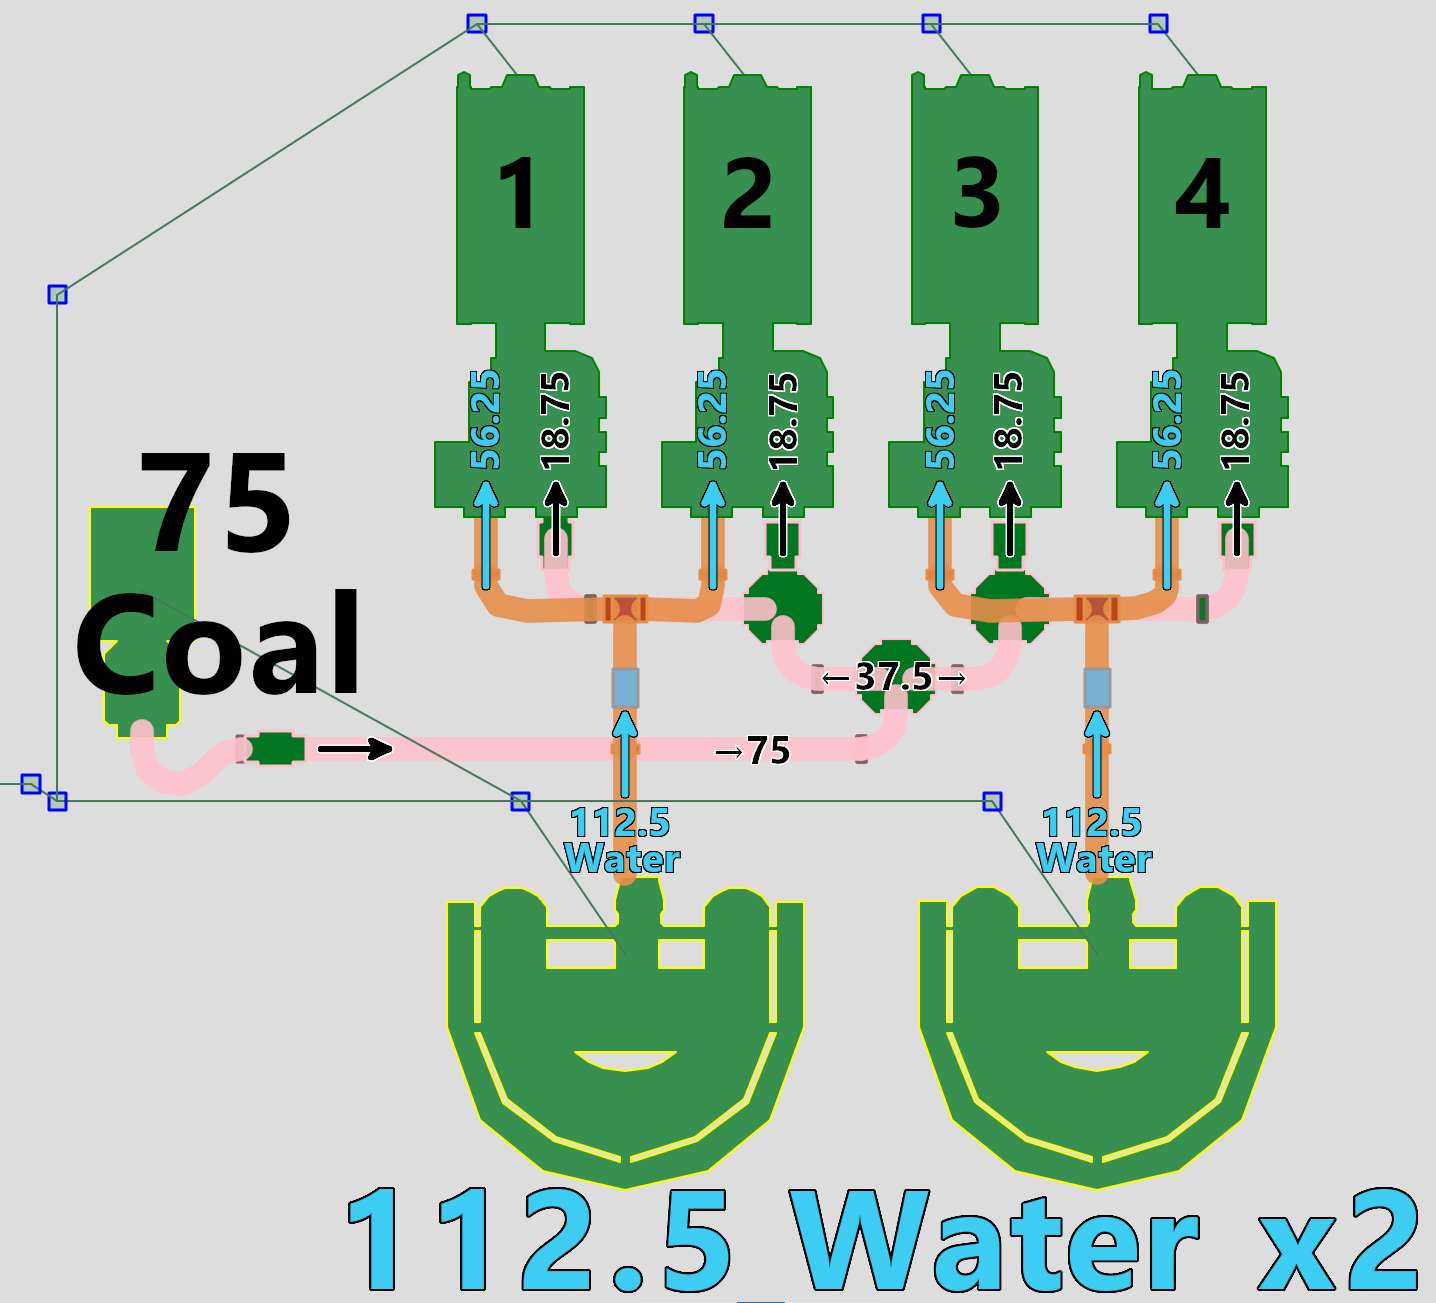
More importantly, when I unlock Mk.3 belts and the Mk.2 miner I will then be able to double the clock rate of these machines and instantly get more power without doing any more building. I could have overclocked these generators to 250% when I initially built them, however when I upgraded the miner I would then need to build an additional two for the extra coal. By building the four coal generators initially @ 125% it meant that I only needed to overclock them when the Mk.3 belts and Mk.2 miner became available.
One Water Extractor Per Generator
The last method I want to show you is having a 1:1 water extractor to coal generator relationship. This is where I start off with 8 coal generators using a Mk.2 belt but each coal generator gets it's own water extractor underclocked to 37.5%.
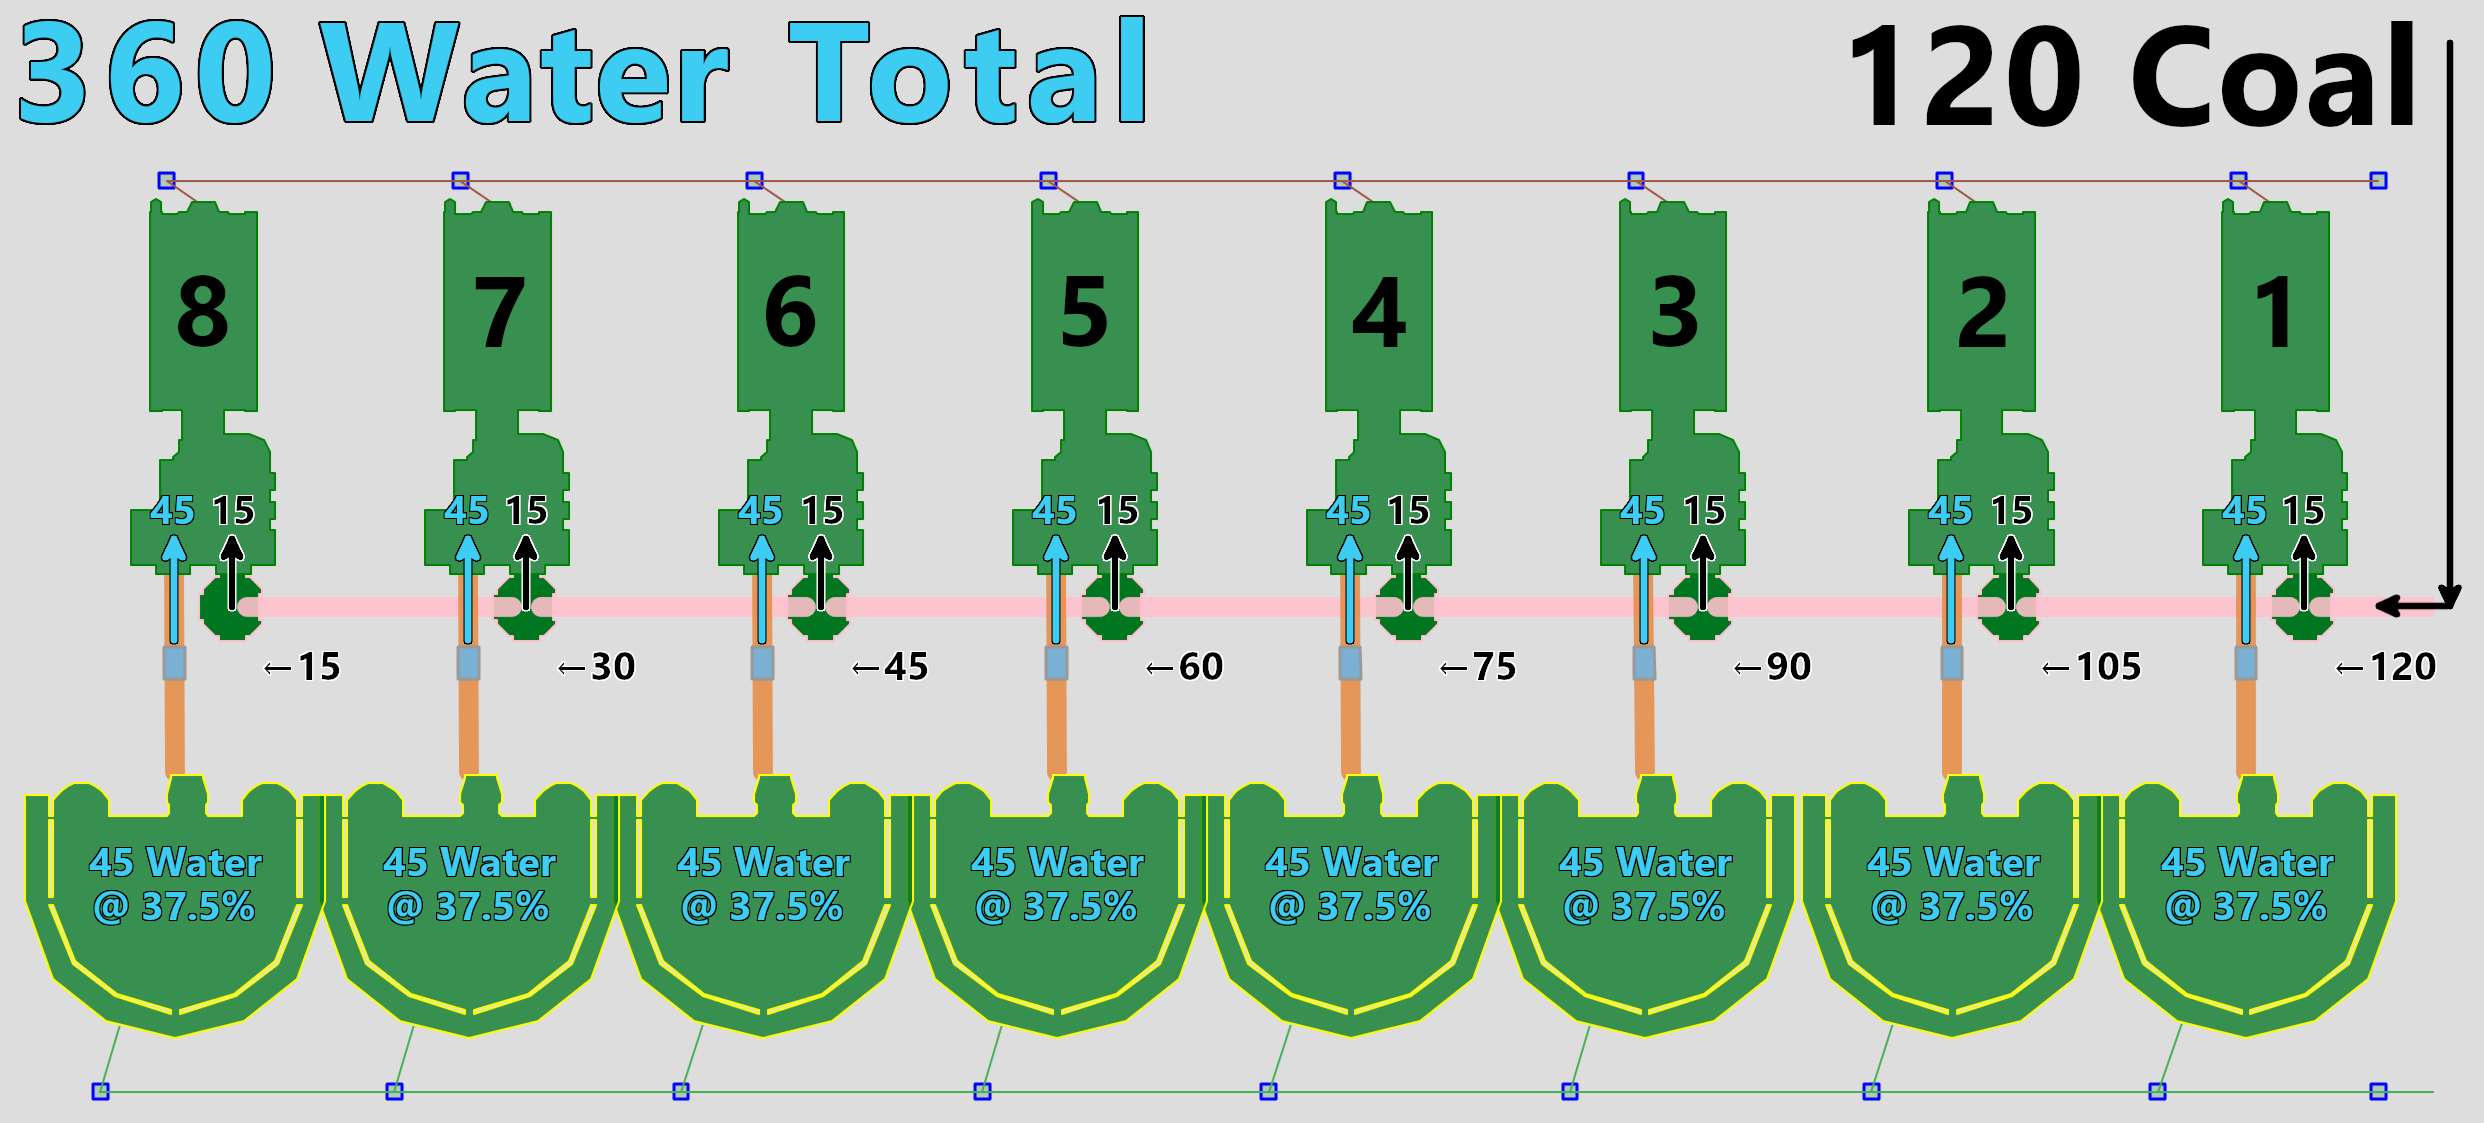
Overall this uses a whopping 16.2MW less power than three @ 100%, so its not really a big saving.
When you later overclock the generators to 200% you only need to clock the water extractors to 75%.

They'll consume 40.6MW less than the three @ 200% overlock AND you don't need any power shards for the water extractors.
So you can see why this 1:1 build has it's merits, especially when you're on the ocean and water isn't a scarcity.
Summary
In summary, the message I am trying to convey here is by planning your coal power builds from the start, you can easily upgrade their power output with minimal effort. Focus on utilising those Mk.2 belts now and wait until you've automated Steel Beams before implementing Mk.3 belts. You'll spend less time manually crafting and be able to invest time on other goals like automating Encased Industrial Beams.
Video
Too much reading? Check out the video for this article here: